
Credits: Thanks goes to Toni Wilen and Ironclaw for feedback and guide corrections
Requirements:
a. latest WinUAE executable (Setup program) from www.winuae.net
b. Kick-Start 1.3 ROM for OCS/ECS A500 demos and Kick-Start 3.0/3.1 ROM for AGA A1200 demos
c. Xvid Codec from www.xvidmovies.com/codec (optional)
d. Fast PC (the faster the better e.g. >2Ghz)
In this guide I will be showing you how to use the Output properties in WinUAE to record an *.avi Video file.
1. First Install the Xvid Codec (optional) then launch WinUAE
2. Load your own A500 config or go to Quickstart properties and select via Model drop down Amiga 500 / Amiga 2000
3. Go to Display properties
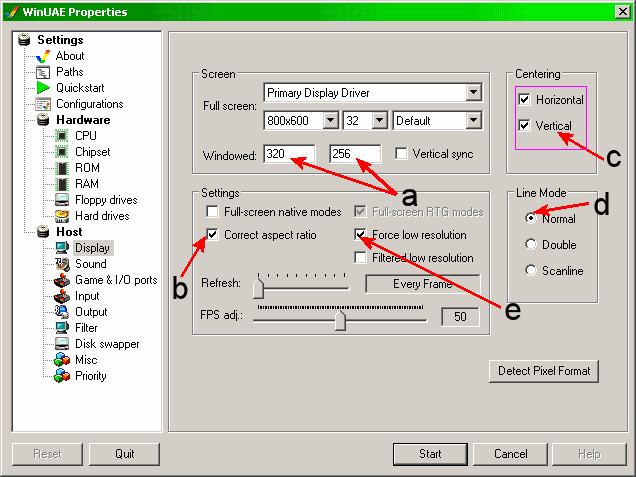
4. Select Screen Size:
For fastest recording speed, In Windowed boxes type in 320 in first (left) box and 256 in second (right) box (arrows a)
Under Settings:- Tick Correct aspect ratio (arrow b) (Not required if using Null filter - step 5)
Under Centring:- Tick both the Horizontal and Vertical settings (arrow c) (Not required if using Null filter - step 5)
Under Line mode:- Select Normal (arrow d)
Under Settings (in latest versions of WinUAE):- Tick Force low resolution (arrow e)
4b. Hi-res 640x512 (requires a fast PC):
For better quality output, In Windowed boxes type in 640 in first (left) box and 512 in second (right) box (arrows a)
Under Settings:- Tick Correct aspect ratio (arrow b) (Not required if using Null filter - step 5)
Under Centring:- Tick both the Horizontal and Vertical settings (arrow c) (Not required if using Null filter - step 5)
Under Line mode:- Select Double (arrow d)
Under Settings (in latest versions of WinUAE):- Remove the tick from Force low resolution (arrow e)

5. Go to Filter properties (Optional but using Null Filter is highly recommended for best performance)
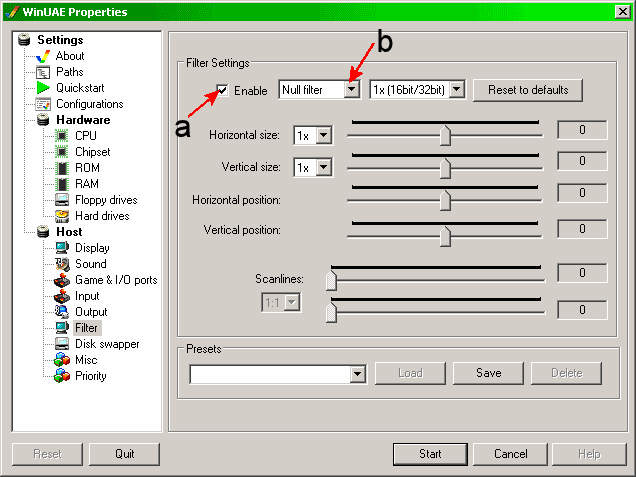
a. Tick the Enable box (arrow a) - Recommended for better performance
b. Also make sure you select Null filter via the first dropdown (arrow b). Leave both 'Horizontal size' and 'Vertical size' at 1x
6. Go to Misc properties and make sure you have the On-screen LEDs box unticked (to disable)

7. Go to Configurations properties and save your new config with name e.g. A500 320x256 Windowed for Output, then click on Save

8. Go to Floppy drives properties
9. On the DF0: slot click the ‘...’ button on the right and select your ADF (Amiga Disk File) e.g. State of the Art (1992)(Spaceballs)
10. Go to Output properties
11. First we need to select the destination directory and file name.
a. Click on '...' (arrow a) and select destination, e.g. My Documents > My Videos folder.
b. Type in the name of your avi file, e.g. State Of The Art (arrow b)
c. Click Save (arrow c)

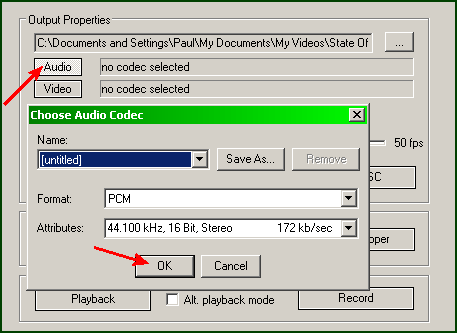
12. Click on Audio and leave it set to PCM, 44.100 kHz,16 Bit, Stereo and click Save
13. Click on Video, select codec via Compressor drop down e.g. XviD MPEG-4 Codec and Click OK
or select 'Full Frames (Uncompressed)' and then use something like VirtualDub (www.virtualdub.org) to recompress the avi file later on (after you have finished recording)

14. Click once on AVI output enabled and click Start to begin emulation and recording.
If you plan to record game play (to run at normal speed) then, untick the 'Disable frame rate limit while recording' box

15. To finish and stop recording you must press F12 and click on AVI output enabled to save result to file.