Back to Home | Workbench 2.x Guide Contents | Site Map
If you have quit WinUAE after the first chapter then
re-launch the program, left click the config you made and click
the Load button.
1. Select the Floppies Properties.
2. On the DF0: slot click the '...' button on the right
and select your 2.0Install disk - In TOSEC - Workbench 2.05
(37.71) Install (A600HD) (Commodore) (1992) A.D.F (Amiga
Disk File).
3. On the DF1: slot click the '...' button on the right
and select your Workbench2.0 - In TOSEC - Workbench 2.05
(37.71) Boot (Commodore) (1992) (International) A.D.F
(Amiga Disk File).
4. On the DF2: slot click the '...' button on the right
and select your AmigaFonts2.0 - In TOSEC - Workbench 2.05
(37.71) Fonts (Commodore) (1992) (International) A.D.F
(Amiga Disk File).
5. On the DF3: slot click the '...' button on the right
and select your Extras2.0 - In TOSEC - Workbench 2.05
(37.71) Extras (Commodore) (1992) (International) A.D.F
(Amiga Disk File).
N.B. If you find any of the drives blanked out, change the middle drop-down from Disabled to 3.5" DD.

6. Then Click Start (OK in older versions of Winuae) to start the emulation.
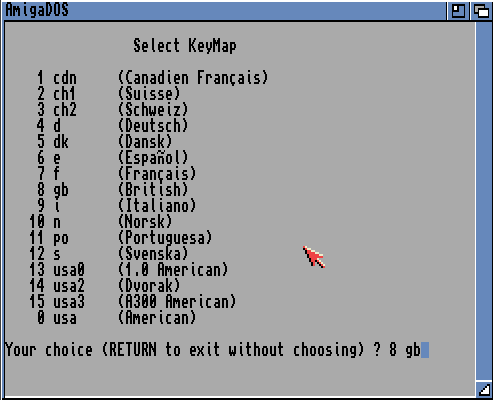
7. When the following KeyMap Selection screen appears
type: 1 and press Return/Enter

8. On the next Select KeyMap screen type in i.e.: 8 gb (or your country i.e. 0 usa) and press Return/Enter.

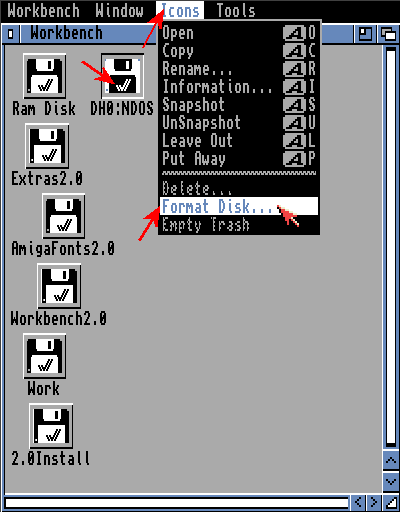
9. When the Amiga has booted you should see Ram Disk, Work, 2.0Install, Workbench2.0, AmigaFonts2.0, Extras2.0 and DH0:NDOS (this is your new blank HD)

10. Left click once on DH0:NDOS to
select.
11. Now go to the top of the screen and hold your right
mouse button down.
12. Hover your mouse over Icons and then to
Format Disk...
13. When Format Disk... is highlighted let go of
the right mouse button.
14. Click the next 2 Continue buttons


15. After format has finished, Left click once on
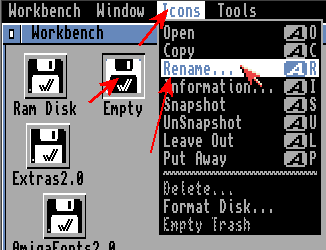
Empty to select.
16. Now go to the top of the screen and hold your right
mouse button down.
17. Hover your mouse over Icons and then to
Rename...
18. When Rename... is highlighted let go of the
right mouse button.

19. In New Name: box delete the word Empty and put System2.0

20. Click ok.
21. Double click on the 2.0Install icon on the
workbench desktop screen. (a window will now open)

22. Double click on the UpdateWB icon.
23. When asked, Is you normal SYS: partition located on
dh0:? Type Y and press Return/Enter.

24. When asked if date is correct, Type Y and
press Return/Enter.
25. When asked do you wish to continue? Type Y
and press Return/Enter.

26. When asked if you want the Outline Font option, Type Y and press Return/Enter.

27. When asked if you want interlace, you are best to
type N and press Return/Enter. (on my real A600 I found
the screen was unreadable with interlace)
28. Install will now finish. When this screen shows
remove all disks by pressing F12, go to the Floppies Properties
and press each eject button on all 4 disk drives.

29. Click Start (OK in older versions of Winuae) to return to emulation.
30. Now restart the Amiga by holding down the 3 keys to
finish setup - CTRL + LEFT WINDOW + RIGHT WINDOW keys. (press CTRL + INSERT + HOME in
older versions of WinUAE) Or you could just press F12 then click reset
on bottom left)
Help! I don't have the full set of Workbench 2.0. Not
to worry, see
http://cpc464.back2roots.org/page07.htm
for the alternative method using just the Workbench boot
disk.
|
|